QB-Desktop-QuickBook--Online-Multiple-Companies-SetUp

QB Desktop and QuickBooks Online Multiple Companies Set Up

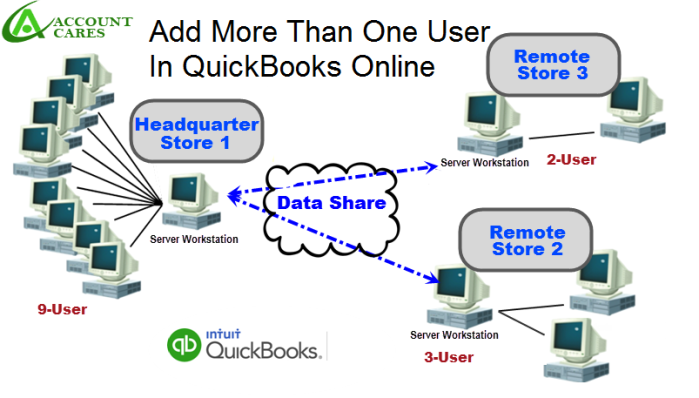
If you run more than one company, instead of adding a new copy of QuickBooks, you can add the company file in the same copy only. For that, you will require following the steps provided by experts. Account Cares is a team of experts working together to provide assistance with the QuickBooks Multiple Users Different Location sand the multiple companies feature

QB-Desktop-QuickBook--Online-Multiple-Companies-SetUp
QB Desktop and QuickBooks Online Multiple Companies Set Up

Before moving ahead, it is important to know that it is available for purchasing offline or you can also subscribe to the online version. In the online version, your data updates automatically whereas, in the offline version, you will have to do it on a regular basis. Both the versions have its own set of advantages and your choice totally depends on the business preferences. 

Online versus Offline Version 

Since there are two versions of the software, there are two procedures you can use the QuickBooks Multiple Users Different Locations feature. It solely depends upon which version you are utilizing. 

In case you’re running the desktop version of the application, the process of adding a new company is same, regardless of what number of companies you open; you will essentially utilize the New Company Interview wizard to carry out the task. You will have a separate file for each new company you open, and you will most likely modify the file for the companies you open as per your preferences. 

Setting Up a Company in the Desktop Version 

The process of using the QuickBooks Online Multiple Companies option is easier than adding a company in the desktop version. For that, you need to follow these steps: – 

  1. Open QuickBooks: The initial step is to open the QuickBooks software on your PC. After opening the application and explore it. When it is open, you can sign in to your account, using your login data. Then click on the “File” tab available on the primary menu. 
  2. Begin the Interview: Once you have clicked on the “File” tab, a drop-down menu will show up with an assortment of options. From this menu, select the “New Company” choice. A “New Company” window will open. From that window pick the option that says “Begin Interview” to start. 
  3. Save the Company File: Now you should enter a couple of preliminary information for your new company. You should give it a name; determine its location and include its contact information. After doing all of that, save the file for your preferred new company to a location that you will remember. In the end; click on the “Next” button. 

In this stage, the “Filename for New Company” dialogue window will open. You should navigate to a particular folder where you might want to save the company file. Give the file a name to save as and afterwards click on “Save.” The new company file will is now created. When you’re done with this, click on “Save” to proceed to the next stage. 

Now, enter information about the company as provided by the dialogue box. Make a point to attempt to fill in all fields since the more information you enter, the better. You also need to incorporate more information such as the credit and business accounts for the new company. This is the last step when you are done with this, simply click on the Finish button. 

Switching Between Companies 

In case you wish to switch from one company file then onto the next, the procedure is clear. In fact, the process is the same for both QuickBooks Online Multiple Companies and offline version. From the present company file, go to the main menu bar and click on the “File.” tab. Once you click on it, you will receive a list of options. From the list, choose the “Open Previous Company” option. You will then be directed to another window with the list of companies that are under your account. Then, search for the particular company file that you want to open and click on it and then use the Open option. 

Note This Blog Is Copy Right My Bloger Post

QB Desktop and QuickBooks Online Multiple Companies Set Up

How to Add More Than One User in QuickBooks Online

How to Add More Than One User in QuickBooks Online

How to Add More Than One User in QuickBooks Online

One of the advantages of QuickBooks Online is the capacity to give other individuals access to your Accounting information. Most regularly, this is utilized to give your accountant, employee, or tax proficient access to your information. It enables them to sign in, see your business and money-related information, and do your accounting for you from their office without annoying you.

Steps for Setting up QuickBooks for Multiple Users

1. Explore to Manage Users

  • Snap on the Gear symbol and select Manage Users, which is situated under the Your Company segment.
  • Explore to Manage Users in QuickBooks Online.

2. Send Invite to Accountant

  • Snap on the Accountants tab.
  • Explore to Accountants tab in QuickBooks Online.
  • Enter your accountant’s email address and snap the Invite catch.
  • Send a welcome to Accountant in QB Online.

3. Your Accountant Is Notified and Setup Process is Now Complete

When you send the invite, the following changes will take place: –

  • Your Online tool will get an email that contains a connection for marking into your QuickBooks Online record
  • Your accounting software will be approached to make a user ID before marking in the first run through
  • Until your Online accountantsigns in, their status on the Manage Users page is “Invited”; subsequent to clicking on the Accept button, the status changes to “Active”
  • Now, your QB Online accountant will be given “Organization Administrator” benefits for performing undertakings like shutting your books for earlier periods

Some Benefits of Setting up QuickBooks for Multiple Users

You can absolutely profit by giving your accountant access to your Accounting information. For instance, a need to impart your information to a colleague can arise at any time. In this case, you will have to give access to your accounting information.

When you have chosen who to offer access to your QB information, at that point you have to choose what data they need access to. QuickBooks enables you to give restricted access to users who don’t have to see everything. A decent principle guideline here is to give people access to just what they need and nothing more.

Here are the means to give QuickBooks Online Multiple Users access to other people.

1. Simply click on the Gear Icon and Select Manage Users That Is Located under the Your Company Column. Now, Visit the Manage Users section in QB Online.

2. Make a New User,Snap-on the Users tab and then Explore to oversee users in your software

3. Select User Type

There are four kinds of users that you can browse while conceding QuickBooks multi-user access or get to:

Select the sort of user you need to offer access to your accounting information, the users are: –

Standard User: For this sort of user, you can give them full or restricted access to choose regions of QuickBooks. This is perfect for somebody who does not require access to everything in QuickBooks, yet in explicit zones. For instance, a clerk whose obligation is to oversee money-due assignments like invoicing and client installments does not require access to any records payable errands.

Company/Organization Admin: The organization manager approaches all your Accounting information just as any extra services you may have through QuickBooks, for example, finance or installments. This dimension of access ought to be restricted to leaders just like the entrepreneur, accomplice, or officer.

Only Reports: You can give reports just access to somebody who does not require access to whatever else. For instance, if you have a tax expert who files your tax return, then you can give him access to only balance sheet, income statement, and cash flow statement.

Only Time Tracking: In the Advanced exercise, we walk you through how to set up time following for temporary workers who need to report their billable hours. The Time Tracking is a valuable component is perfect for contractual workers since they just need access to QuickBooks so they can report hours that they worked without getting to every one of your information.

4. Set User’s Access Rights

There are three sorts of user get to rights you can set in your accounting software. These include: –

All rights for access: This will give the user boundless access to all your Accounting information. This incorporates including, altering and erasing exchanges identified with all merchants, clients, deals and buys. The main access that is excluded here is authoritative rights, which we will cover later in this exercise.

No rights for access: This is the inverse of all entrance rights. This dimension of access does exclude access to any of the Accounting information. Be that as it may, it will enable this user to finish timesheets and oversee different services that you may buy in to like Intuit installments.

Limited access rights to view vendors and customers: This enables you to concede access to simply clients and merchants. This dimension of access incorporates all exchanges identified with clients and sellers aside from the accompanying:

  • Restricted access to clients and sellers in QuickBooks Online.
  • Include, alter, and erase records and the stock amount available.
  • View bank registers.
  • View all-out salary and costs on the home, merchant, and client pages.

In case you do require somebody to play out any of the errands recorded above, you won’t most likely select Limited access for this user. Rather, you should give them all entrance with the goal that they can play out these undertakings.

5. Users Are Notified, and Setup Is Complete

  • When you send the welcome, the accompanying will happen:
  • The new user will get an email that contains a connection for marking into your QuickBooks Online record
  • The new user will be approached to make a user ID before marking in the first run through
  • Until the new user signs in, his or her status on the Manage Users page is “Invited”. Once the invitation is accepted, the status automatically changes to “ACTIVE”

If you wish you can also attain proper information on QuickBooks Multiple Users Different Locations, then you can contact us. We hope that with this blog, you now understand the importance of multi-user access in QB online.

Read More Information Go To my Orginial Source page-

Ultimate Guideline To Install QuickBooks For Multiple Users

Note This Article is CopyRight Of My Rediff bloger-

How to Add More Than One User in QuickBooks Onlinehttp://blogs.rediff.com/loganmason0007/2019/03/28/multi-user-in-quickbooks-online/?preview=true